Experiencing a flat tire can be an unexpected setback for any driver, regardless of experience or frequency on the road. Understanding how to change a flat tire on a car is a valuable skill, ensuring you’re not left stranded and can continue your journey safely.
Whether you’re preemptively preparing or already find yourself roadside with a deflated tire, you’re in the right place. This guide will arm you with essential knowledge, a step-by-step process, and even share our top product recommendations to aid you in the tire-changing process.
Dive in and equip yourself with the know-how to tackle flat tires confidently.
Safety First: Prioritizing Your Well-being During a Tire Change
When confronted with a flat tire, your safety and the safety of others should be the primary concern. Before diving into the process of changing a tire, ensure you take the following precautions:
- Choose a Safe Location: If you notice your tire has gone flat while driving, don’t panic. Gradually reduce your speed, avoid abrupt steering, and look for a flat, stable area away from traffic to pull over. Ideally, this would be a parking lot or a wide shoulder on the road.
- Activate Your Hazard Lights: As soon as you realize there’s an issue, turn on your hazard lights even after pulling over. This alerts other drivers of your situation, ensuring they give you ample space and approach with caution.
- Use Safety Cones or Triangles: If your vehicle has safety cones or reflective triangles, set them up behind your car to increase visibility, especially if you’re on a busy road or in low-light conditions. They serve as an additional warning sign to approaching vehicles.
By taking these precautions, you not only ensure your safety but also create a secure environment to change your tire efficiently. Consumer Reports’ project leader for tire testing notes that although “changing a tire is a straightforward task in perfect conditions,” the reality is that “often the location is dangerous, such as a busy roadway, or there’s a wrinkle, such as when you find out your car doesn’t have a working spare tire.”
Traffic school can help you keep a clean driving record, prevent insurance increases, and more!
Essential Tools and Equipment for Changing a Tire
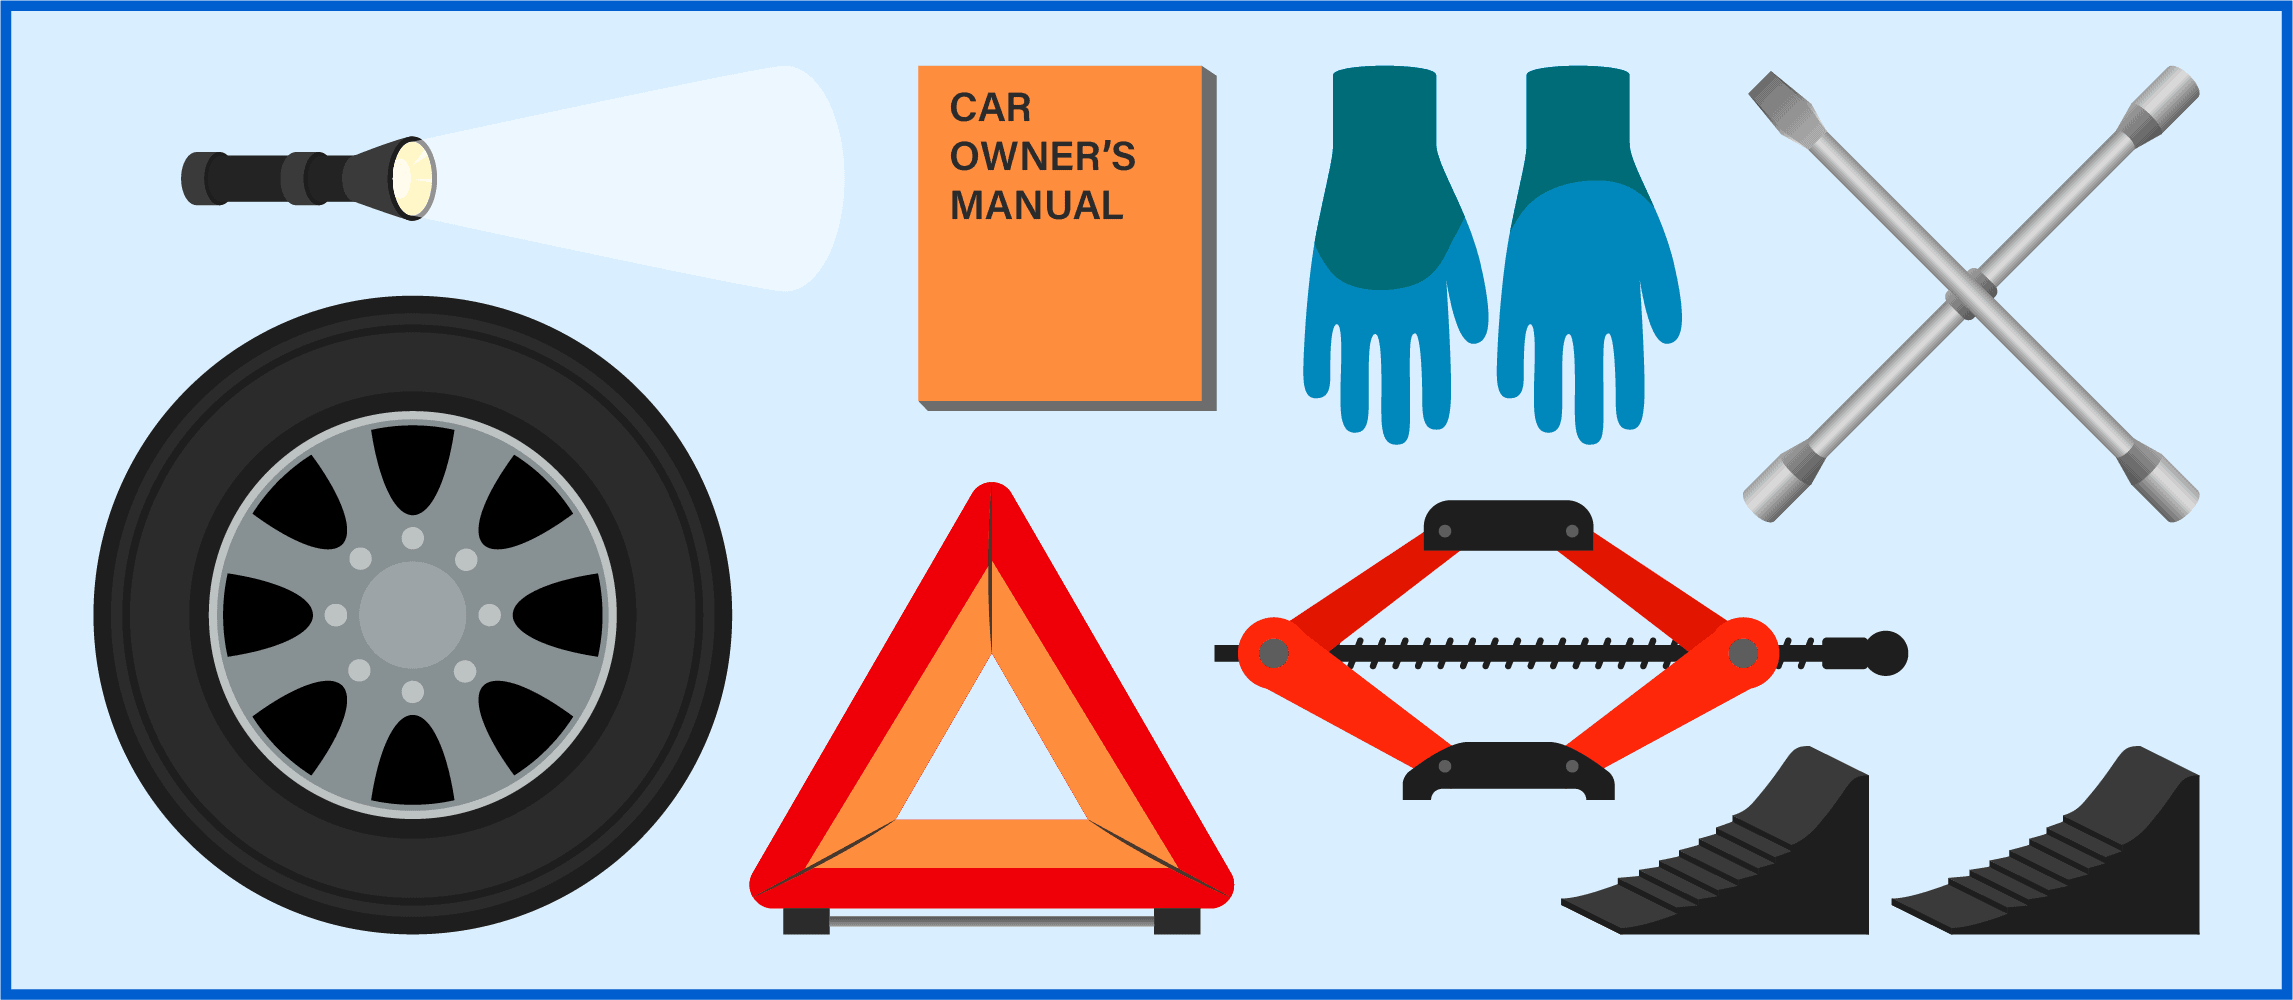
When you’re faced with the task of changing a tire, having the right tools at hand is crucial. Before you begin, ensure you’ve gathered the following indispensable items:
- Jack: An essential tool to lift your car safely off the ground.
- Lug Wrench: Vital for loosening and tightening the lug nuts.
- Spare Tire: Always double-check that it’s adequately inflated. An underinflated spare won’t do you any favors on the road.
- Vehicle Manual: While not a tool per se, your car’s manual often contains specific instructions or recommendations for tire changes, tailored to your vehicle model.
For an even more seamless tire-changing experience, especially in challenging environments or conditions, consider having these additional items on hand:
- Safety Gloves: Protects your hands from dirt and provides a better grip.
- Flashlight: Crucial if you’re changing a tire in the dark. Ensure it has fresh batteries or is fully charged.
- Reflective Triangles or Safety Cones: Enhances visibility, alerting oncoming traffic to your presence.
- Wheel Wedges: Prevents your vehicle from moving unexpectedly.
- Weather Gear: A raincoat or poncho can be a savior during unexpected downpours.
By being well-prepared with the right equipment, you not only make the process of changing a tire safer but also more efficient.
How to Change a Flat Tire on a Car
Parking Safely after Experiencing a Flat Tire

Your immediate safety is crucial:
- Stay Calm: A sudden flat can be alarming. Keep both hands on the wheel, reduce speed gradually, and avoid abrupt maneuvers.
- Choose Your Spot: Aim for a flat, stable location away from the flow of traffic, like parking lots or wide road shoulders.
- Use Hazard Lights: Immediately activate your hazard lights to alert other drivers of your situation.
- Exit Safely: Always check for oncoming traffic before opening your door. If on a busy road, exit from the passenger side.
- Visibility Aids: Set up reflective triangles or safety cones behind your vehicle, adjusting distance based on road type and visibility conditions.
- Awaiting Assistance: If you decide to wait for professional help, stay well away from the flow of traffic, preferably behind barriers or on a safe patch of grass.
Comprehensive Steps for Changing a Flat Tire
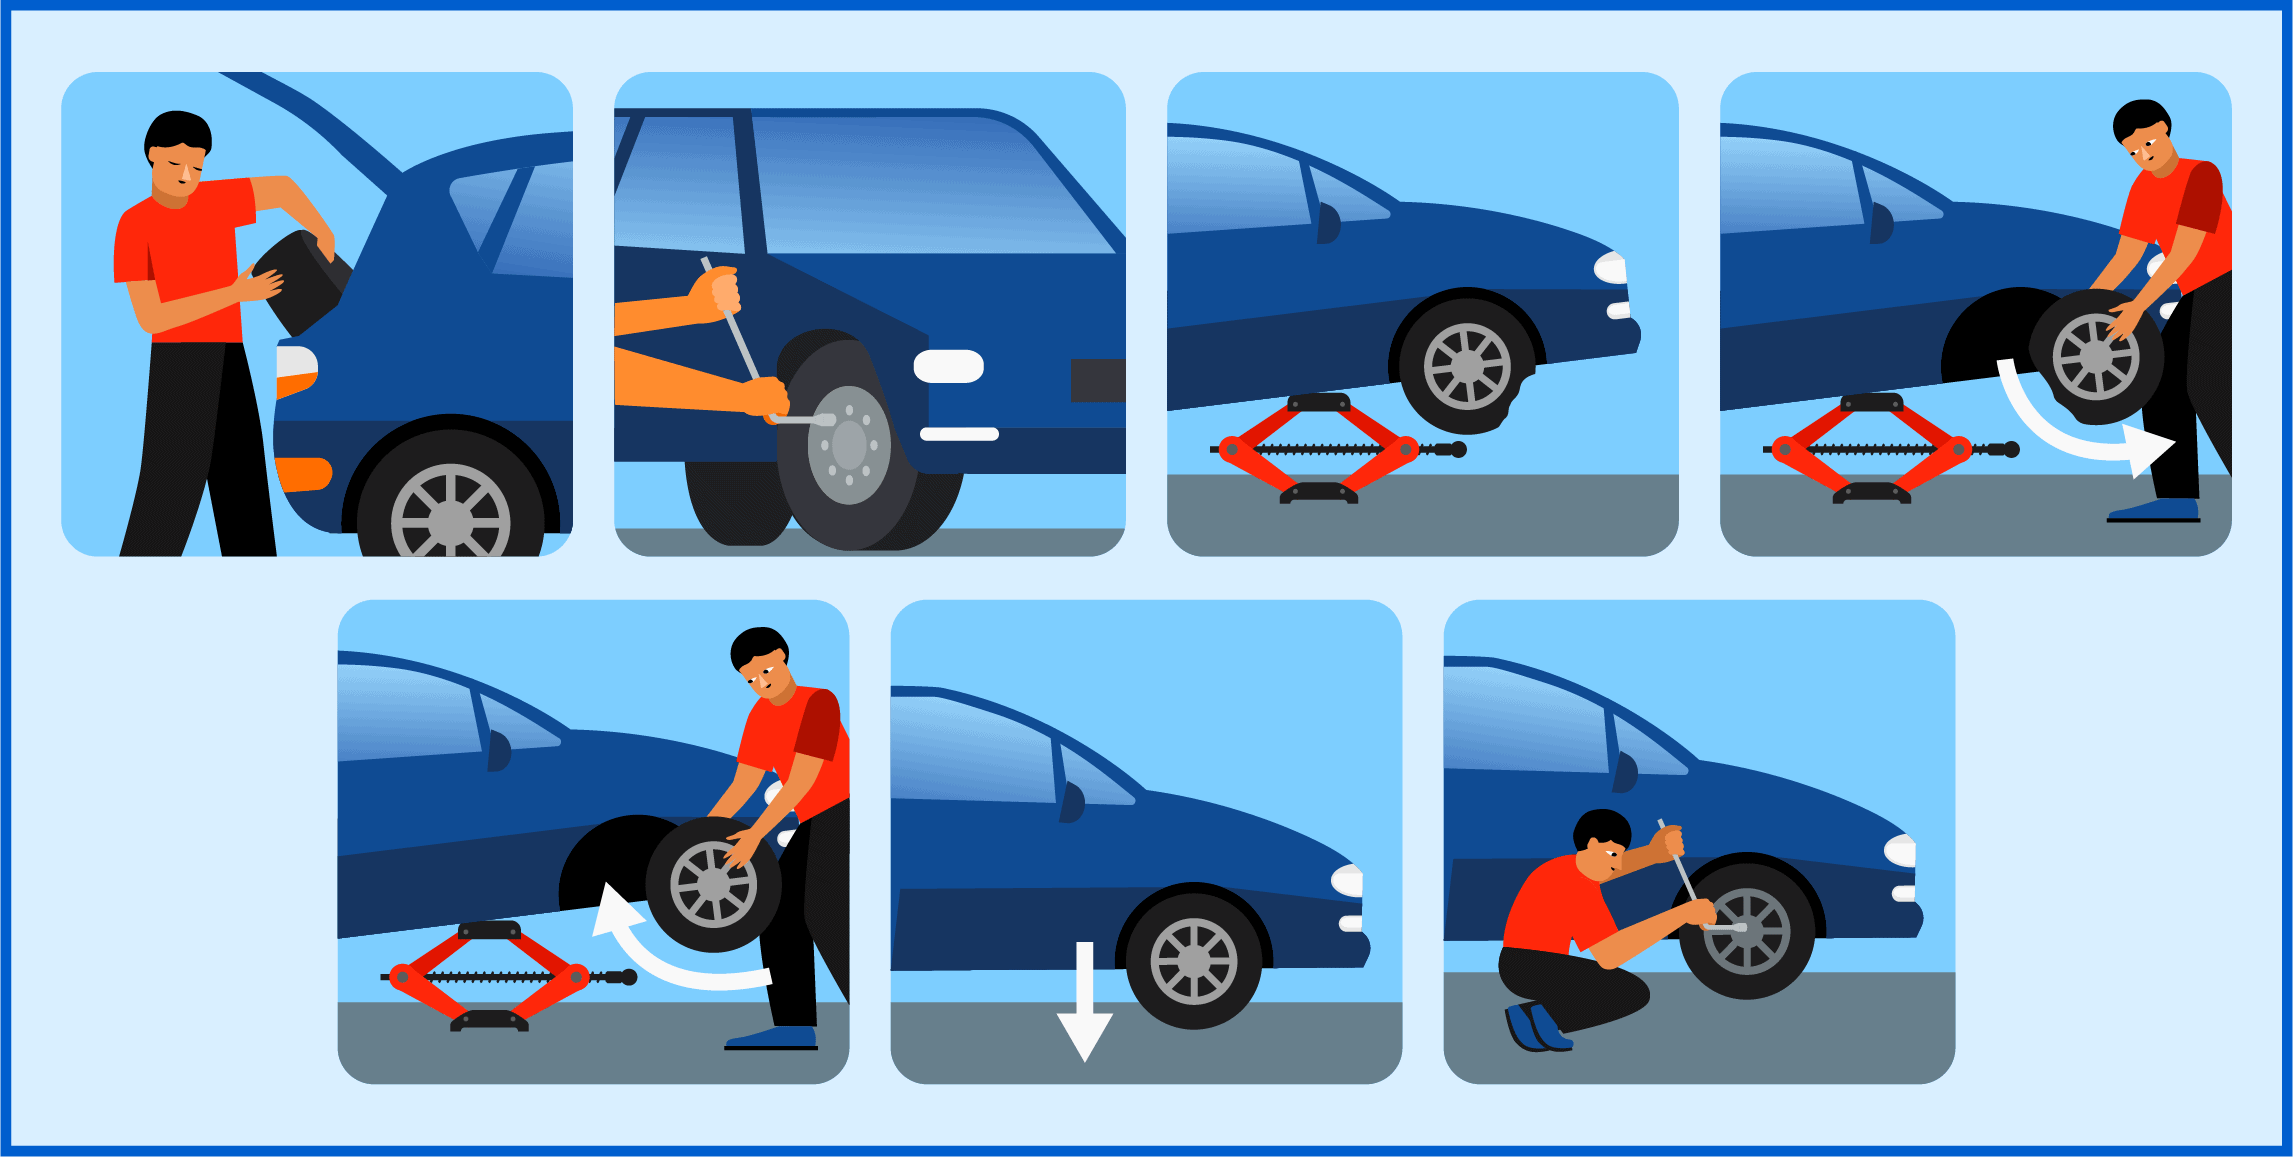
- Locate Your Spare Tire:
- Check your vehicle manual if unsure, but most spares are in the trunk beneath a floorboard. Some trucks have them mounted underneath the rear of the vehicle.
- Loosen the Lug Nuts:
- Use the flat end of your lug wrench to pry off the hubcap.
- Position the wrench on a lug nut, turning counterclockwise. Loosen each nut slightly but don’t fully unscrew them.
- Position the Jack:
- Refer to your vehicle’s manual for the specific jack points to avoid damage.
- Place the jack so it contacts the vehicle at the designated point, ensuring stability.
- Lift Your Vehicle:
- Turn the jack handle clockwise. As the car raises, ensure the car remains stable. If it wobbles, lower and readjust the jack.
- Remove the Flat Tire:
- Fully unscrew the loosened lug nuts and set them aside where they won’t roll away.
- Grip the tire on opposite sides and pull it straight toward you.
- Install the Spare Tire:
- Position the spare so the lug bolt holes align with the bolts on the wheel hub.
- Push the spare onto the hub until it sits flush.
- Hand-Tighten the Lug Nuts:
- Screw each lug nut back on by hand to ensure they’re not cross-threaded.
- Tighten them as much as you can without the wrench.
- Lower Your Vehicle:
- Slowly turn the jack counter-clockwise to lower the vehicle.
- Once on the ground, remove the jack.
- Securely Tighten the Lug Nuts:
- Tighten each lug nut in a crisscross pattern to ensure even pressure.
- Apply weight to the lug wrench for maximum tightness.
- Pack Everything Up:
- Store your tools and the damaged tire in your vehicle. Ensure nothing is left on the road.
Always remember that the spare, especially if it’s a “donut,” is a short-term solution. It’s designed to get you to a service center, not for prolonged use. Check its air pressure and drive carefully, adhering to any speed restrictions indicated on the spare.
Be sure to check out our guide on how to clean your tires and how to test the tread depth using the Tire Penny Test.
After Changing Your Tire: Next Steps and Precautions
Successfully changing a tire on the side of the road or in a parking lot can bring a sigh of relief. However, a few crucial steps remain to ensure safety and vehicle readiness for future travels:
1. Proper Storage of Tools and Flat Tire:
After the tire change, it’s essential to ensure all tools, including the jack, lug wrench, and any other equipment, are safely stored in their designated places. This not only keeps your vehicle organized but prevents potential hazards or damages from loose tools rolling or shifting while driving.
As for the flat tire, secure it in your trunk or backseat, especially if it’s not fitting in the usual spare tire spot. If necessary, consider using bungee cords or straps to prevent it from moving.
2. Assessing the Spare Tire’s Condition:
Even if the spare tire looked good and got you back on the road, it’s crucial to check its air pressure soon after installing it. A spare, especially if it’s been stored for a long time, might not be at its optimal pressure.
Many gas stations have air pumps, and some vehicles come equipped with portable tire pressure gauges. Ensure the spare’s pressure matches the recommended PSI (Pounds per Square Inch) mentioned in your vehicle’s manual or on the tire sidewall.
3. Addressing the Flat Tire:
A flat tire isn’t always doomed for the junkyard. Depending on the nature and location of the damage, many flats can be repaired. As soon as you can, visit a reputable tire service center or garage. They can assess the damage and inform you whether a repair is possible or if a replacement is necessary.
Even if you believe the damage is minor, it’s a good practice to get a professional opinion. Driving on a damaged tire, even after a makeshift repair, can be risky.
4. Some Risks of Using Donut Tires
It’s best practice to have a spare tire that closely matches the ones on your vehicle, but in most cases, a spare “donut” tire can work as a temporary solution. If you do find yourself in a situation where a “donut” is your only option, keep these safety tips from Top Driver in mind:
- Make sure the tire pressure of the donut is 60 psi.
- Keep your speed under 50 mph.
- Check your owner’s manual to see the maximum distance you can travel on your donut.
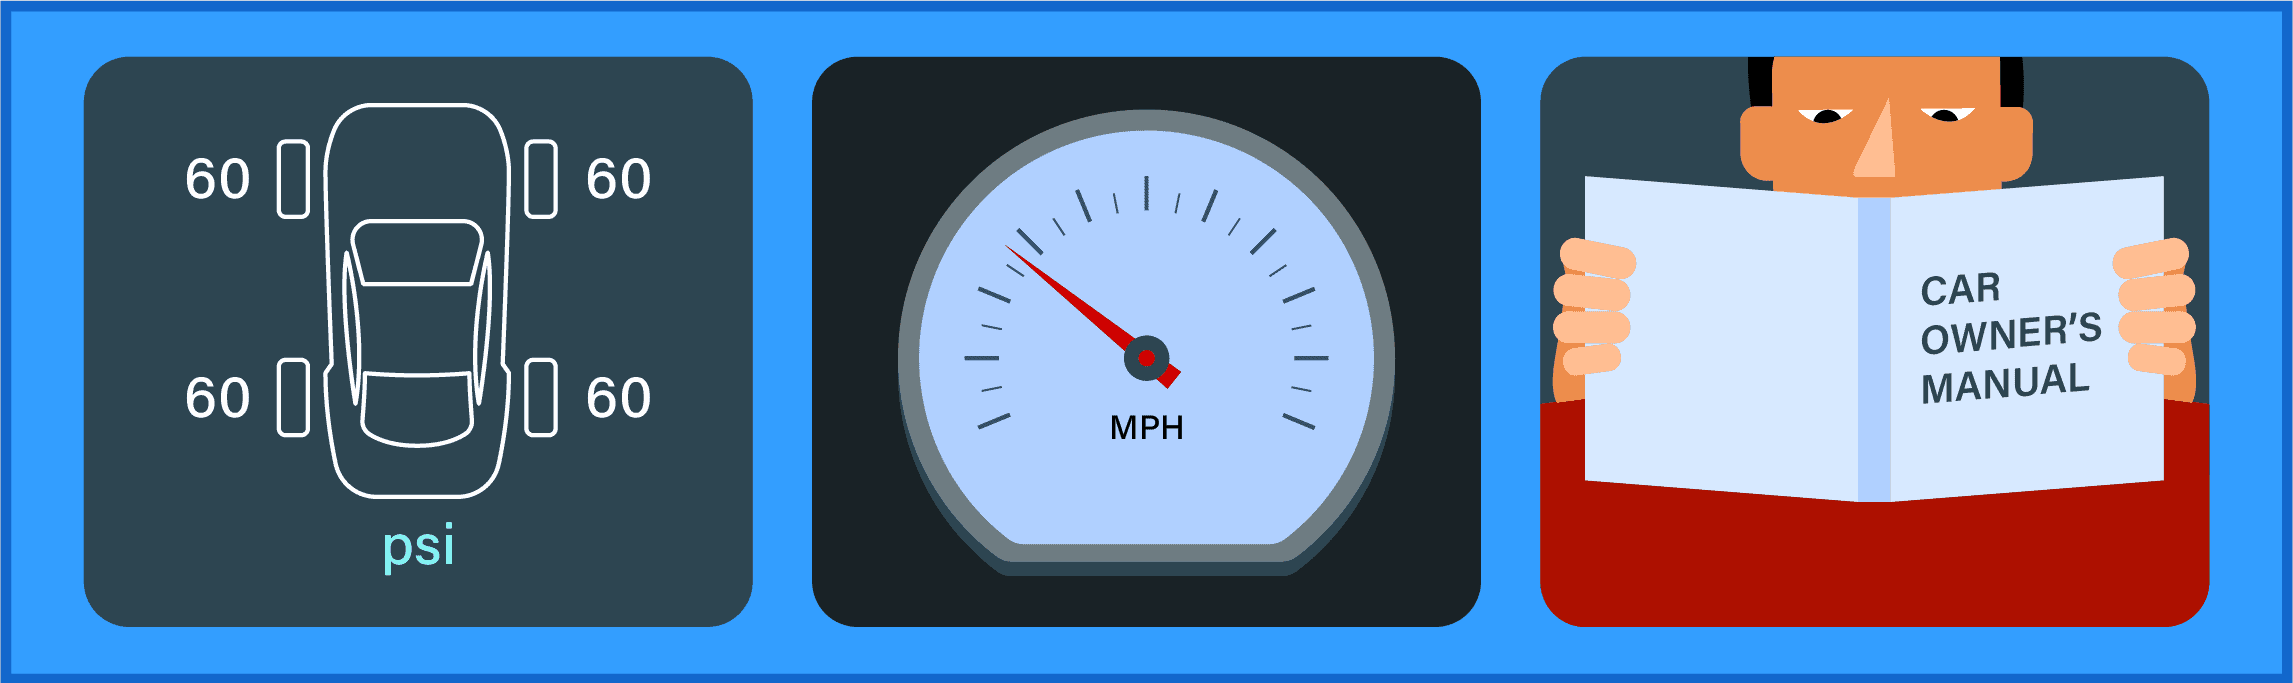
While driving on a spare, the vehicle will handle differently, and extra precautions should be taken while braking or cornering. With all of this in mind, you must limit your risk by making every effort to get your tire replaced as soon as possible.
How Long Should You Expect to Spend Changing a Tire?
Typically, if you’re following the outlined steps diligently, changing a tire should take between 15 to 30 minutes. That said, several external factors, such as inclement weather conditions or a high-traffic environment, might extend this duration.
Your primary focus should always be safety. It’s essential to remain composed, methodically follow each step, and ensure all components, especially the lug nuts, are correctly and securely in place. Rushing the process can lead to mistakes, which can compromise your safety when you resume driving.
Looking for a pro tip? Bridgestone suggests that familiarity can speed up the process without compromising safety. Consider practicing tire changes a few times in a controlled environment, like your garage or driveway. Not only will this make you more efficient, but it also ensures you’re well-prepared if you ever face a real-life tire emergency.
Top Products to Aid Your Tire-Changing Experience
Searching for the most reliable products to facilitate your tire-changing endeavor? Based on rigorous research, we’ve curated a list of top recommendations to ensure a smooth and efficient process:
1. FEANISIFEI Electric Car Jack
The challenge of manually lifting your vehicle can be daunting. Enter FEANISIFEI’s 12V electric car jack—a game-changer for many. With its hydraulic mechanism, it can effortlessly raise sedans or SUVs weighing up to 11,000 pounds in under two minutes.
The added benefit? Its built-in inflatable pump can produce up to 150 psi pressure. Operable via your car’s cigarette lighter or battery, this jack is akin to having an extra pair of hands during a tire change.
2. Universal Folding Lug Wrench
Conserving trunk space is essential, even in larger vehicles. Our pick for efficient storage without compromising utility is the 14-inch universal folding lug wrench from WorkPro. Priced at just $16, it’s a staple for those in need of a reliable lug wrench.
A glowing review on Amazon states: “This was a Christmas gift for my daughter. Given her car’s distinct front and back lug nuts, this was a lifesaver during a flat tire incident. Its robust build ensures durability, evident from multiple uses on various cars with no signs of wear or cracking—common issues with similar wrenches. Plus, the accompanying travel/storage pouch is a boon!”
3. Solid Rubber Heavy Duty Wheel Chocks
Safety is the cornerstone of tire-changing, and what better way to ensure that than with MaxxHaul’s heavy-duty wheel chocks? They excel in keeping vehicles stationary, eliminating the risk of unexpected movements.
Their all-weather design, combined with a rubber traction pad, ensures stability in diverse climates. Both lightweight and resilient, these chocks come equipped with a handy built-in handle, making them a top choice for those seeking additional security during tire replacements.